
Click here for photos of this build
This build is a Michigan with some uber figured sapele for the back and sides and old growth Red Spruce for the top.
_________________________________________
Jul 4: Holiday today, but we didn’t have much going on this morning, so I glued the top to the rims. With that, the box is closed…yay! I don’t have enough bloodwood purfling for Travis’ guitar, so I needed to make some more. I ripped a strip of bloodwood and ran it through my thickness sander to take it down to .02″ thick. I then sandwiched it between some black fiber and clamped it nice and tight while the glue dried. It will be resawn later into thin strips.
Jul 3: Today is brace carving day. I voice the top by removing wood from the braces, listening to the top as I tap near the bridge location, and measure how much the top deflects under a fixed amount of weight. Each top, even from the same species of spruce, has its own weight and stiffness characteristics. The only way to bring out the best of each top is individually voice it. I worked with the chisel until I was happy with how the top was responding. I then cleaned up the top with some sandpaper. I don’t particularly voice the back. Rather, I shaped the braces somewhat like an inverted V. This lightens the braces while still keeping them stiff. I do this with a small thumb plane and follow up with sandpaper.
With the back braced, I fit it to the rims. I notched the rims to allow the end of each brace to pass through the rim. I then glued and clamped the back to the rims.
Jul 2: I had a few braces to get on the top. One being the upper transverse brace. This brace runs across the upper bout above the sound hole. I design my neck block with a fingerboard extension support that butts into this brace. The trick is getting the brace glued into position. I first notched the top to let the ends of the X braces through the rims. I made the upper transverse brace and notched the rims so the brace butted tightly against the neck block. Once I was happy with the fit, I put the upper transverse brace in place on the rims, fitted the top, then reached in through the sound hole, and grabbed the brace firmly against the top. I lifted the top and marked the location of the brace. I put the top back in my go bar deck, and glued in the upper transverse brace, sound hole reinforcements, and a couple of finger braces that sit above the upper transverse brace.
I ran the back through the thickness sander to clean up the back inlays and finished up with the random orbital sander. Then I went back to the thickness sander to remove material from the inner part of the back until I had the back at the proper thickness. A little work with the random orbital sander, and the back was ready for braces. I first glued down a cedar strip to reinforce the joint where the two panels were joined for the back. The four mahogany back braces pass through this cedar strip. I used a small razor saw and chisel to remove a section of the reinforcement strip so the brace could sit firmly against the back all the way across. The back braces were then glued and clamped.
Jul 1: I ran the top through the thickness sander to clean up the rosette then flipped the top over and sanded material from the back side of the top until the top was at the desired thickness. I dropped the top on the CNC and cut the sound hole. With the rosette done and top at the desired thickness, the top was ready for bracing. I use hide glue to attach the braces and plugged in the glue pot while I joined the X braces and laid out the bracing pattern on the top. I first glued down the bridge backing plate then followed up with the X brace, tone bars, and finger braces.
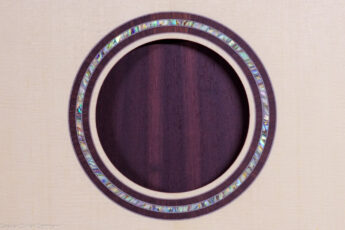
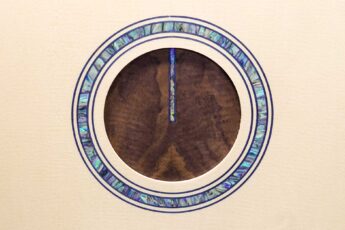
Travis saw the split inlay I have used previously on the back of some guitars and asked for the same for his guitar. I had previously cut the needed paua abalone strips, so I mounted the sapele back to my CNC table and cut pockets for the shell. Once I had inlaid the shell and the glue had cured, I cut thin channels for bloodwood purfling and inlaid those strips. I’ll level the inlays later then sand the back to the desired thickness prior to gluing on the back braces.
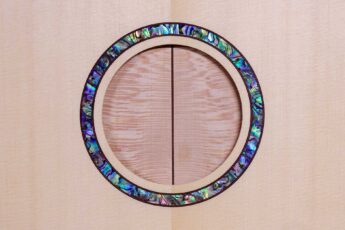
Jun 30: Ryan was in town for a long weekend and wanted to work on his guitar build, so I didn’t get any time to work on Travis’ guitar until today. The goal for the day was to get the rosette inlaid. Following nine holes of golf this morning with my wife, I headed for the shop. Travis wants one of my more popular rosettes that use two rings of wood from remnants of the back with a single ring of abalone shell in the middle. Once the back is cut out, the remaining wood is not large enough for a single wood ring. But I can cut small sections that can be pieced together to form the circle. I lined up the wood, so the grain ran from the outer edge of the rosette toward the sound hole and cut 16 identical pieces on the CNC. I also cut arcs of abalone that would by joined to form the center ring. With the wood and shell cut, I mounted the red spruce top on my CNC and cut a pocket for the wood ring. I glued in the sapele pieces to form the wood ring, ensuring that each piece fit very tightly to the adjoining piece. After the glue had dried, I cut the pocket for shell using the CNC and inlaid the abalone pieces. Lastly, I had the CNC cut channels for the four bloodwood purfling rings and inlaid each ring. Tomorrow, I will run the top through the thickness sander to clean up the rosette.
Jun 22: I had a little time today to sand the linings. I will be building the back with a 15′ radius to provide some humidity change protection. To provide a matching radius gluing surface, I sanded the face of the back linings with a 15′ radius bar, making sure to also slope the upper and lower bouts, so the top has a 15′ radius in all directions. The top linings were sanded flat, but I used a small block plane and a sanding bar to slope the rims downward from the waist to the neck block. The slope is equal to 2.1 degrees, which will give a nice fingerboard plane for a low action. The last step with the rims was to glue in some reinforcements a various places around the rims. The idea is these can help stop a crack from opening up further if the guitar is dropped. I have no experience whether they help or not, but the do stiffen the rims a bit, which I do believe is a good thing.
Jun 20: I sanded the inside of the rims, glued and clamped the tail block. Once dry, I glued in the neck block. While the glue was curing on the neck block, I ran the top and back through the thickness sander to clean them up following glue up. The joints look near invisible. Just the way I like them. I need a good base to glue the top and back to the rims. To provide this base, I glued in mahogany linings around the inside edges of rims.
Jun 19: I am using some old growth red spruce for the top of Travis’ guitar. The set I have has a few knot intrusions, so I used a template to make sure I had a good, clear area for the top. I then cleaned up the two edges to be joined, brushed on some glue, and put the top in my joining jig.
I usually have some neck blocks and tail blocks for each of my models made up. But going through my stock, I had neither for the Michigan, so I had to make some more. I cut out rectangular blocks from mahogany. As the top of the upper bout and bottom of the lower bout are radiused, I needed a matching radius on one face of the blocks. The easiest and most consistent way of doing this is with my CNC. After milling the radius, I cut a 2.1 degree slope in the top of the neck block and glued on piece of mahogany that supports the fingerboard extension under the spruce top. The slope is required to tilt the fingerboard plane slightly back and away from the top to get proper distance between the strings and the frets.
Jun 18: I got Travis’ Michigan started today. Years ago, I purchased a flitch of some of the most gorgeously figured sapele I have ever run across. Travis wants to use a set of this wood for his guitar. I pulled a set from the flitch and ran it through the thickness sander a few times to clean up the surfaces so I could see the grain well. Given the figure, I wanted the two back plates bookmatched perfectly when gluing. Once I determined which edges to join, I ran the joining edges through the table saw to clean them up and used a long sanding bar to sand the facing edges dead flat. I have a jig for joining panels that holds the joining edges down while pushing the joints together. A little glue, and I had the panels joined and sitting in the jig.
The sides were overly thick, so I ran them through the thickness sander to get them down to a bendable thickness. I then hit both the inside and outside faces with the random orbital sander to remove the thickness sander scratches. I spritzed a side with water and dropped it in the bender. After the side had cooled, I clamped it inside the building mold, which helps maintain the shape, and repeated the process with the other side
Leave a Comment