

Click here for photos of this build
I delivered this build to Joan on October 15th. I always love delivering a custom guitar to a customer. Joan’s guitar is a left handed St Clair with East Indian rosewood back and sides and an Engelmann top.
_________________________________________
Oct 15: I met Joan near Battle Creek and handed off her custom guitar. What a pleasant person. Joan has been great to work with throughout this build. I am honored she chose me to build her guitar.
Oct 13: I haven’t updated the blog for a few weeks. I shot the lacquer then let the guitar cure for two weeks prior to level sanding and buffing out. Last week, I glued on the bridge, drilled and reamed the bridge pin holes, installed frets on the fingerboard, leveled and dressed them. Rather than glue down the fingerboard extension, I bolt it to the fingerboard extension platform on the neck block. I used the router to cut a pocket in the top for the tabs that I glued onto the fingerboard extension. I made a nut and a saddle and strung up the guitar! Always exciting to get strings on a new guitar. Nut slots and saddle were initially set on the high side. I put my ToneRite on the guitar over the weekend, which helps the guitar settle in a bit more quickly. Monday, I dialed in the action and notified Joan the guitar was ready for pickup. I snapped some glamour photos yesterday and will meet Joan near Grand Rapids Thursday morning to deliver her guitar.
Sep 8: I grabbed some fine sandpaper and leveled the pore filler. Prior to moving any further with finishing, I needed to locate the bridge. I measured where the bridge needed to be, and I laid down a mask the exact size of the bridge. This will keep lacquer off that part of the spruce top, so I have nice clean wood to glue the bridge to. I also masked the fingerboard and neck tenon and stuffed some paper towels in the sound hole to keep out the over spray. To seal the spruce top, I shot a couple of coats of sanding sealer on the top and one more on the rest of the guitar. I’ll start spraying lacquer next week.
Sep 7: I drilled the holes for the tuning machines and went over the entire guitar checking for sanding scratches. I put down a couple of swab coats of sanding sealer then worked through three applications of pore filler to smooth out the rosewood surfaces.
Sep 4: The only thing left to do on Joan’s build was to drill holes for the tuning machines. With the right bits and my drill press, drilling the holes was pretty easy. I’ll pull out the pore filler and start the finishing process next week.
Sep 3: Plan today was to make a rosewood bridge for Joan’s guitar. As this guitar will be for a left hander, I needed to tweak my CNC coding to have the saddle and bridge pins slope the opposite angle compared to my normal bridges. I was out of rosewood bridge blanks, so I pulled a rosewood block I had purchased over a dozen years ago, and cut it into a half dozen bridge blanks. I dropped one of these blanks on the CNC table and put it to work. The CNC first milled the wings, followed by the top radius, and lower contour and radius. At this point, the shape was largely there. I installed a small end mill and had the CNC cut a slot for the saddle, cut holes for bridge pins, and cut the side and top profile. Joan wanted to inlay the same horseshoe inlays used on the fingerboard into the wings of the bridge, so I cut pockets in each wing for the mother of pearl inlays. Here things got interesting. As I just finished one inlay pocket and was moving to the other side of the bridge, a tornado alert came over the phone, and the power blipped off. Fortunately, it came back on a bit later, and I was able to mill the last pocket.
I pulled the bridge from the CNC table and sanded it thoroughly to remove any milling marks. I worked up the grits to 400 and finished with a nice coat of wax applied with fine steel wool. The bridge turned out great!
Sep 2: I glued a rosewood cap on the heel this morning. Even though I use a CNC to mill the neck, I have to final shape and sand the neck by hand. I used a combination of rasps, files, and sanding blocks to give the neck a good shape and feel. I also rounded over the outer corner of the bindings and gave the body one more good sanding. Many luthiers simply knock off the corner of the binding. I spend a lot more time to sand in a bigger radius, which makes the body much more comfortable to hold and play. All that is left prior to finishing is drilling holes for the tuning machines and making a bridge.
Aug 31: I’ve been working on the fingerboard and headstock for Travis’ guitar, but I had time today to glue on the fingerboard.
Aug 27: Even though the fingerboard is done, I don’t glue it on until the headstock is completely done. I had made the face laminate last fall and sent it off to Joan to do some engraving. I did need to make a laminate for the back of the headstock. I used the CNC to cut a channel for a fine run of purfling around the perimeter and a pocket for a representation of Lake St Clair. I glued these in then ran the laminate through the thickness sander to clean up the surface.
Prior to gluing on the laminates, the headstock profile needed to be cut. I marked the location then used a pattern and a pattern bit in my router to cut the headstock profile. With the profile cut, I oriented the face laminate on the headstock and marked where the lower edge that will eventually butt into the nut needed to be cut. I then cut that end at a 15 degree angle on my table saw. The laminates and fingerboard can now be glued on. At this point, the order doesn’t really matter, but I chose to glue the recently made back laminate on first.
Aug 22: The goal today was to get the fingerboard made. I pulled a nice dark board from the shelf and ran it through my thickness sander to clean up each major surface. I do most of the work on the CNC, and I first cut the inlays from mother of pearl shell. I like to have these available so I can check the fit in the inlay pockets as they are milled. Once the inlays were cut, I mounted the rosewood board on the CNC and first milled a 14′ radius along the top surface. I followed up with routines that milled pockets for the shell inlays and a channel for the purfling. Prior to cutting the fret slots, I glued in the purfling, taking time to miter all corner joints. Once the glue had cured, I ran the last routine, which cut slots for the 20 frets.
I removed the fingerboard from the CNC and glued in the inlays. After the glue had cured, I used a long sanding bar to level the purfling and inlays. With that, the fingerboard was done!
Aug 20: After a great mountain bike ride this morning, I had the rest of the day to work in the shop. I pulled my mortise and tenon jig from the shelf and clamped in the neck for Joan’s guitar. I have a pattern cutting bushing mounted on my router that guides the router around a pattern to cut both the mortise and tenon. As I built the guitar with a 2.1 degree slope from the soundhole to the neck joint, I needed to cut the shoulders for the neck tenon to have a matching 2.1 degree slope. The jig held the neck at this matching 2.1 degree angle so when the tenon was cut, the shoulders would have the proper angle. All this ensures the fingerboard plane will provide a nice low action.
After cutting the neck tenon, I drilled holes for the hardware needed to bolt the neck to the body. I also drilled holes in the mortise for the bolts to pass through from the body to the neck. Even though my jig cuts the proper shoulder slope at the neck tenon, the shoulders do not match the slight radius to the upper bout. I cut this radius using a chisel and flossed the joint with sandpaper. I worked through the process slowly, removing very small amounts from the shoulders until the neck fit tightly to the body.
Because the neck is milled with the fingerboard bed facing down, the CNC could not mill the 15 degree slope to the face of the headstock. The CNC did mill the back surface of the headstock, the front face, however, I cut on the bandsaw and followed up with the stationary belt sander. I removed just enough from the face so the forward edge of the nut rests right along the start line of the 15 degree slope.
Aug 18: I ran the neck blank over the jointer to level and square up the fingerboard bed. I put the neck in the vice on my CNC and milled a slot for the truss rod. I then flipped over the neck and mounted it on my CNC table so the heel and neck profile could be milled. A half inch end mill was used initially to rough out the shape and followed up with a ball mill to finish the surfaces. Later, I will use the router to cut the tenon on the heel, and I’ll cut the face at a 15 degree angle using the bandsaw.
Aug 11: We have had a lot of family in town, so shop time has been limited, and what time I have gotten has been spent getting the body of Travis’ Michigan buttoned up. But I did have a little time today to glue up the laminations for the neck of Joan’s St Clair. Joan and I traded a few emails and decided to do a 9 piece laminated neck. I pulled some mahogany from the shelf and sawed it into blanks for both Joan’s and Travis’ guitar necks. For Joan’s guitar, we are running a couple of wider curly maple laminations banded by fine black. I got the laminations glued and clamped. I should have time next week to get the blank on the CNC.
Jul 22: When I installed the binding and purfling, they were put in a bit proud. I used a scraper and sanding block to level the binding purfling to the body. I then used a sanding block to sand the rims to 220 grit. I used a random orbital sander to sand the top and back. The body is now largely done. At a future date, I’ll cut a mortise for the neck tenon and also round over the binding.
Jul 21: Installing binding and purfling around the back is a bit easier than the front as the back has only a single purfling run for trim. However, the joints where the binding and purfling come together at the top of the upper bout need to be perfect as there is no neck joint or fingerboard to hide them. I glued and taped the purfling and binding up one side, leaving enough to allow me to cut and square up each end. Once I was happy with the length, I finished gluing and taping the binding and purfling in place along the first side. I repeated the process on the other side, sanding the end of each piece until it butted perfectly to the ends from the other side. The body was wrapped tightly in twill tape once again to pull the binding and purfling tight to the body.
Jul 18: Goal this week is to get bindings on Joan’s St Clair. I bent some curly maple strips to be used for binding and a pair of wider rosewood strips for top trim. While the maple and rosewood strips were in the bender, I routed channels around the perimeter of the top and back for purfling and binding. I cleaned up the channels with a small file and scraper so the binding and purfling would fit very tightly to the body. The fit was good. Time to glue them in. I cut miters on the ends of the side purfling to match the miters running up each side of the tail graft. The binding and top trim have a butt joint at the tail. I squared up all the ends for these joints. Once all the pieces were ready to go on, I started at the tail and glued in the side purfling, binding, top purfling, and top trim a few inches at a time. I applied glue to the surfaces then taped the pieces tightly to the body. After I worked my way around one side of the top, I repeated the process around the other side of the top. To pull in all the pieces tightly to the body, I very tightly wrapped the entire body in twill tape and left the body overnight to cure.
Jun 17: The back braces are essentially rectangular strips of 1/4″ mahogany with a 15′ radius cut along the bottom. The back isn’t voiced like the top, but I do want to lighten the braces. I have a small thumb plane that makes quick work of shaping the back braces. After using the plane, I followed up with sandpaper to clean up the braces and sand the entire inner side of the back. Like the top X brace ends, I let the ends of the back braces through the rims. I marked the location, then used a razor saw, laminate trimmer, and file to open up just enough for the brace ends to pass through the lining and rims. Then I glued the back to the rims. After the glue had dried, I used the laminate trimmer to trim off the overhang. The top was glued on next and the overhang trimmed. We now have a St Clair body!
Jun 15: Each spruce top has a unique weight and stiffness. Therefore, each top needs to be voiced to get the most out of the top and generate a consistent tone. The first step in voicing was to sand enough material from the top to the point that the top is on the edge of losing some of its stiffness and integrity. I did this prior to gluing on the braces. Next, braces were glued to the top to restore some stiffness. The braces I had glued to the top were cut oversize and consequently made the top too stiff. The last step in voicing was to remove material from the braces, slowly loosening up the top, until the top was flexing the way I want. I used a chisel to carve spruce from each of the braces, essentially allowing the braces to flex more. I carved away spruce then tested the flex in the top by tapping on the bridge location and measuring how much the top deflected under a fixed amount of weight. This process continued until the top was moving the way I wanted. I then sanded the braces and top with fine sandpaper, and the top was ready to be glued to the rims.
I reinforced the joint where the two back plates were joined by gluing down a cedar strip. Once the hide glue had cured, I removed a small section of the reinforcement strip to allow the mahogany back brace to pass through. I used a small razor saw and chisel to remove the reinforcement strip. The trick here was to open up the slot just enough for the brace. I don’t like sloppy joints, so I worked slowly until all four back braces fit snugly. I then glued in and clamped the back braces.
Jun 13: Today was bracing day. I took the dog for a walk, then before breakfast, I plugged in my glue pot to start heating up the hide glue I would be using to attach the braces. I dry clamped the X brace in place and used that as a guide for locating the bridge backing plate. Once that was in, I glued down the X brace and followed up with the tone bars and finger braces. I am building the top with a 40′ radius. The bottom of the braces were cut to a 40′ radius, and the top was placed in a large 40′ radius dish prior to gluing and clamping the braces. This ensured the top will have a slight 40′ radius after bracing.
I still needed to glue on the upper transverse brace, which runs across the upper bout and snugs against the end of the fingerboard extension platform on the neck block. I want this brace to fit perfectly against the neck block. To get this snug fit, I made the brace then notched the rims so the brace spanned the upper bout and butted tightly against the neck block. The top was braced with the ends of the X braces extending beyond the sides of the guitar. I located the top on the rims and marked each X brace end on the top of the rim. Using a small saw, my laminate trimmer, and a file, I notched the rims to let through the X braces. I could then fit the top tightly to the rims. With the upper transverse brace and the top in place, I reached through the sound hole, lifted up the upper transverse brace along with the top, marked its location, and glued it in place. The last braces to go on were the sound hole and X brace reinforcements. The top is now ready for voicing.
While waiting for glue to cure on bracing, I glued in some reinforcements along the inside of the rim. Some argue that these can prevent a break from spreading if the guitar is dropped. Maybe they can. I do believe they add a bit of stiffness to the rims, which may help the top and back resonate just a bit better.
Jun 12: Family left today, so I was able to get a couple of hours in the shop. I fired up the CNC and pulled some wood to use for bracing. The CNC is helpful in putting a 40′ radius on the bottom of the braces and cuts the rest of the brace profile a bit oversize. After the braces are on, I use a chisel to remove wood from the braces as I voice the top. The two bigger braces that make up the X brace are notched and glued together prior to gluing to the soundboard. I used a template to layout the location of the braces then marked where the two X braces needed to join. Using a small saw and file, I cut matching openings in each brace. I worked slowly and carefully on this as I like this joint to be nice and tight. Once I liked the fit, I glued the two braces together. Last I could squeeze in today was to make a maple backing plate for the bridge.
Jun 9: I have family arriving today for a few days, but I had some time this morning to run the top through the thickness sander to clean up the rosette. Once the rosette was looking good, I sanded the side of the top with the rosette with my random orbital sander and some fine sandpaper to clean up the scratches left from the thickness sander. I then took the top back to the thickness sander and slowly removed wood from the opposite side of the top until the top was flexing as I wanted. I then used the random orbital and that side of the top. The top is now ready for bracing.
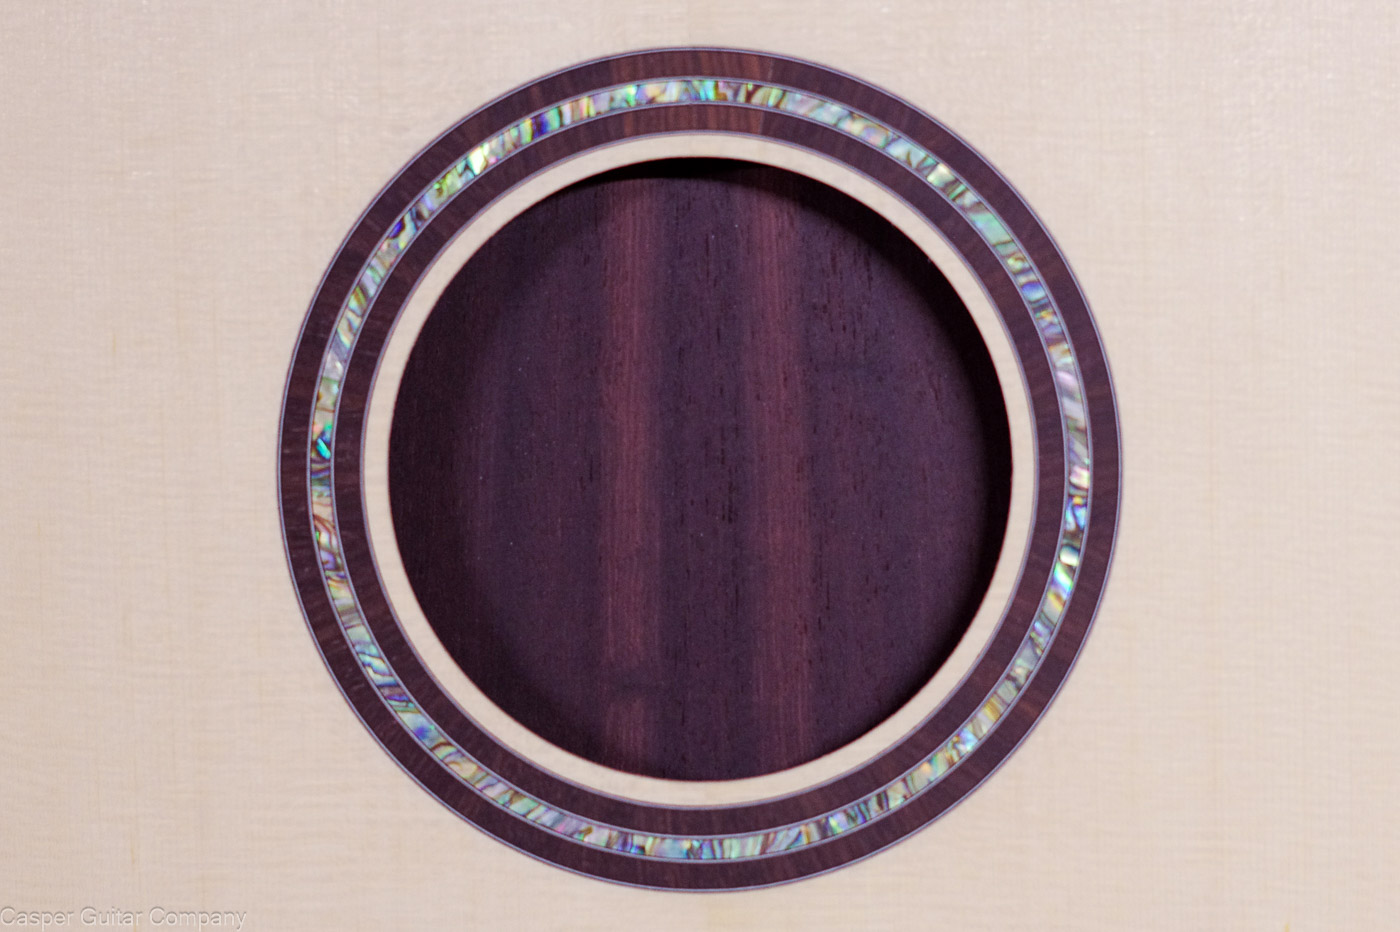
Jun 8: Today I inlaid the rosette. I had already cut out the shell and wood needed for the rosette. I marked the location for the center of the sound hole and mounted the Engelmann top on my CNC table. I first inlaid the rosewood pieces by cutting a pocket with the CNC and gluing in the pieces. I had previously laid out the pieces so the edges of one piece best matched the grain and color of the adjoining piece, so installing was simply a matter of spreading glue in the pocket and pressing in the wood pieces. Once the glue had cured, I used the CNC to mill a pocket for the abalone shell ring. Here as well, I laid out the pieces to get the best match of color and chatoyance. When done carefully, the joints basically disappear. After the glue had dried, I used a fine endmill to cut the pocket for the black/white/black purfling. I do this two rings at a time. Once all the purfling was in, I left the glue to dry.
Saturday, I had glued in the kerfed linings. These needed to be sanded to get them ready for the top and back. The top linings were sanded with a flat bar to provide a nice level surface across the top. To get the proper plane for the fingerboard, I also sanded a drop off from the sound hole to the neck joint. Basically, the drop off is a slope just over a couple of degrees. The back linings were sanded with a 15′ radius sanding bar, which sanded the linings to the same radius I will be building the back.
Jun 6: Glued the linings to the rims today. I used kerfed linings and glue the kerfed edge to the rims, which stiffens and strengthens the rims slightly better than joining the other face. The linings provide a solid gluing surface to attach the top and back. The gluing surfaces need to be sanded and the back linings radiused, but I’ll do that another day after the glue has fully cured.
Joan wants a wood rosette with a single ring of shell running around the center of the wood ring. I like to make these rosettes with the wood grain running radially around the rosette. To get that effect, I cut small pieces with the grain oriented the same way across all pieces. When assembled, the grain will run toward the center of the sound hole. This would be difficult if I didn’t have a CNC ;). While I had the CNC warmed up, I cut the abalone shell needed for the center ring.
Jun 5: After pulling some weeds and getting some more mulch down, I got back to the shop. I made the blocks for the neck and the tail and glued them into the rims. The neck block is a bit tricky as I glue and dowel a support for the fingerboard extension that also butts into the upper transverse brace. The fingerboard extension support is built with a slight angle sloping up from the rim joint. The angle ensures the proper plane of the upper bout, so the fingerboard plane remains flat while providing proper string height above the frets. This little block is key in making a guitar playable.
With the back plates and top plates joined, I ran each of these through the thickness sander to remove the glue and clean up the back and top. I took the thickness for each down a bit, but I will take off more and fine sand once the rosette has been inlaid in the top and inlays completed on the back.
Jun 4: We are now officially underway on Joan’s guitar. I pulled an Engelmann set to use for the top and my nicest East Indian Rosewood to use for the back and sides. I joined the top and back plates and set them aside. I precut the profile of the sides prior to bending, and ran each of the sides through the bender. I have broken enough sides over the years, I always get a bit anxious when bending wood for the rims. East Indian rosewood is typically very cooperative when bending due to all the oils in the wood. That was the case with the sides for Joan’s guitar. They bent without any issue. Yay!
Sep 2025: Joan had some inlay ideas for the headstock of her guitar that I will be building next summer. She wanted to engrave the inlay, so before closing up the shop for the summer, I designed, cut the inlays, and made the laminate for the headstock. I sent the laminate to Joan, and she will have the winter to do her engraving.

Joan Burlew-Saxton
October 16, 2026 10:50 amI met with Kenneth and picked up my beautiful St Clair guitar that he built. It is such a pretty instrument!!
I followed along with the build through the process and Ken really put everything I wanted and hoped for into it.
The sights are amazing on it and the sound so far is very satisfying!!
Thank you Ken for making a dream and vision come true for me!
Kenneth Casper
October 16, 2026 2:15 pmThanks Joan! Happy the guitar met your expectations. I enjoyed working with over the past year to build that little gem!